


Trong bất kỳ hệ thống mail server nào, bạn cần tạo Recipient Objects và định cấu hình để họ gửi và nhận email. Bạn là quản trị viên hệ thống của Microsoft Exchange Server, bạn thường phải tạo, sửa đổi hoặc xóa đối recipient object. Vì vậy, điều cần thiết là bạn phải hiểu rõ về quản lý Recipient.
Module này mô tả cách bạn có thể quản lý recipient objects, address policies, và address lists trong Exchange Server
Bài lab sử dụng 3 máy DC1, EX1, và CL1 (máy client windows 10/11 không join domain)
Lab A: Quản Lý Exchange Server recipient objects và public folders
Exercise 1: Quản lý recipients
Task 1: Tạo Adventure Works Cycles AD DS objects
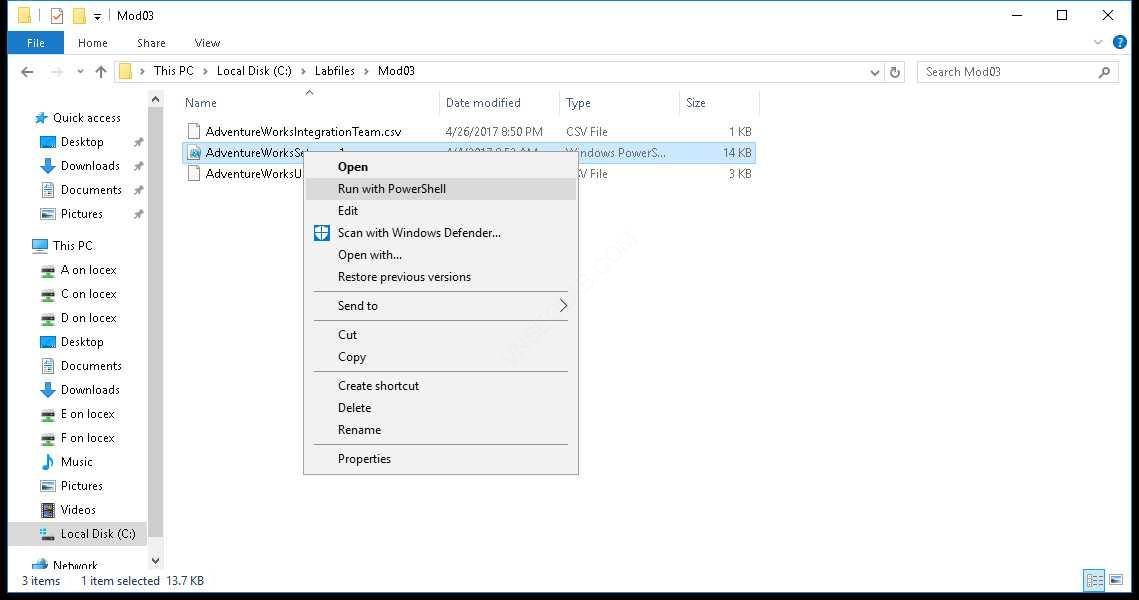
- Tại máy EX1, vào C:\Labfiles\Mod03 phải chuột vào file AdventureWorksSetup.ps1 chọn Run with PowerShell

2. Vào Run gõ lệnh DSA.MSC, kiểm tra trong OU AdventureWorks có các OU con và user bên trong.


3. Đóng cửa sổ Active Directory Users and Computers.
Task 2: Tạo Adventure Works Cycles mailboxes
- Tại EX1, vào Start, chọn Microsoft Exchange Server 2016/2019, chọn Exchange Management Shell.
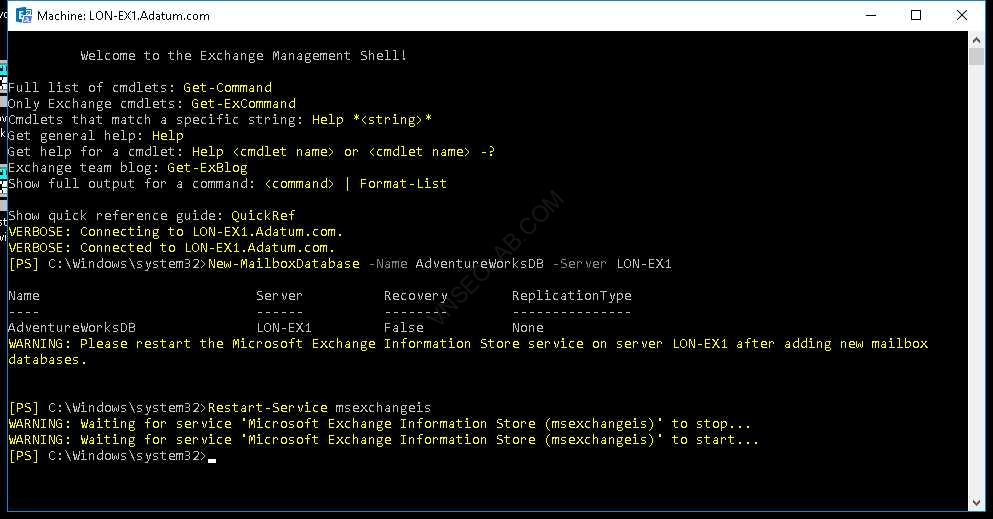
- Tại Exchange Management Shell gõ lệnh để tạo mailbox database mới:
New-MailboxDatabase –Name AdventureWorksDB –Server EX1


3. Tiếp tục gõ lệnh: Restart-Service msexchangeis
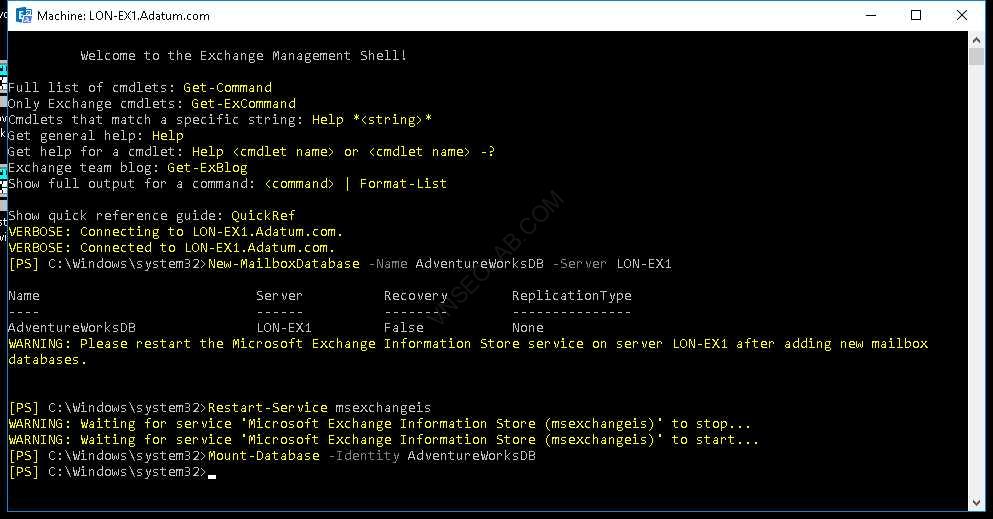
4. Thực hiện lệnh sau để mount database:
Mount-Database –Identity AdventureWorksDB
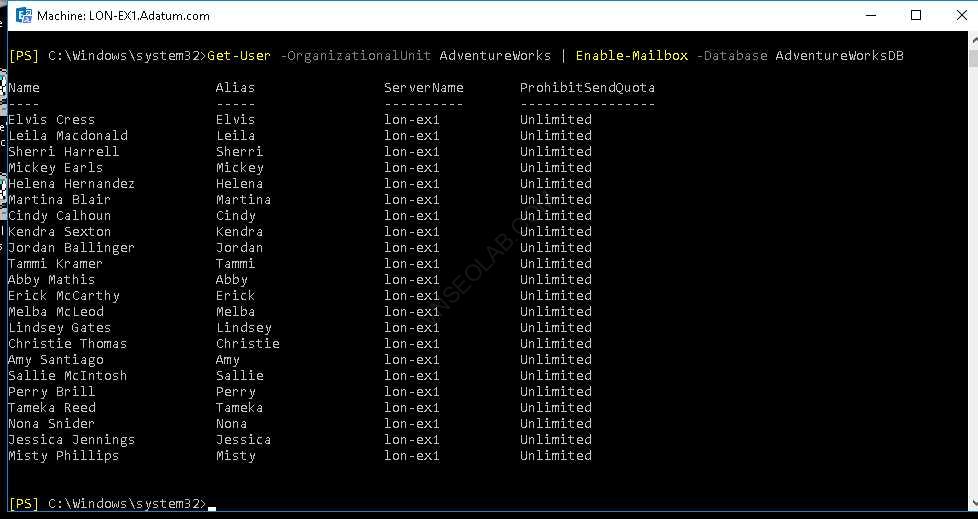
5. Thực hiện lệnh sau để enable mailbox cho tất cả user trong OU Adventure Works Cycles:
Get-User –OrganizationalUnit AdventureWorks | Enable-Mailbox -Database AdventureWorksDB

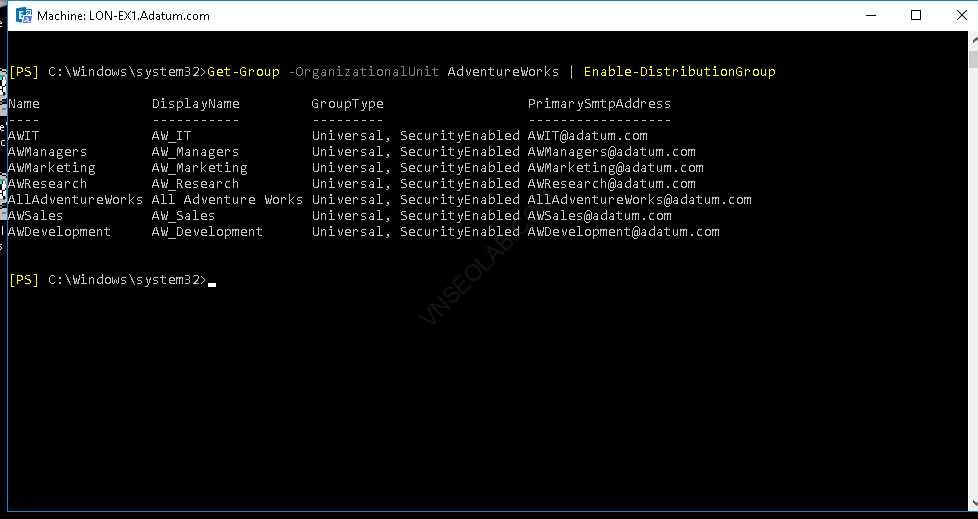
6. Thực hiện lệnh sau để enable mail cho tất cả các group Adventure Works Cycles:
Get-Group –OrganizationalUnit AdventureWorks | Enable-DistributionGroup
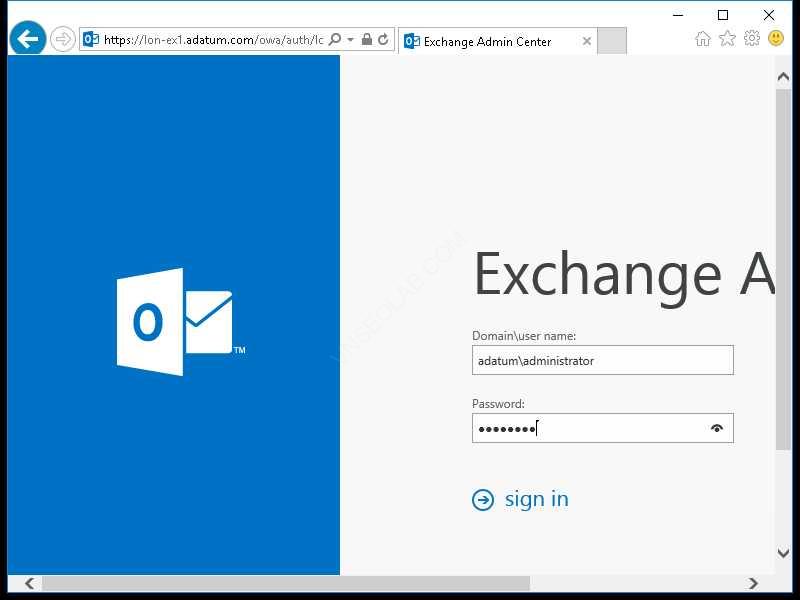
7. Tại EX1, vào Internet Explorer truy cập vào trang:
https://EX1.adatum.com/ecp với user Adatum\administrator

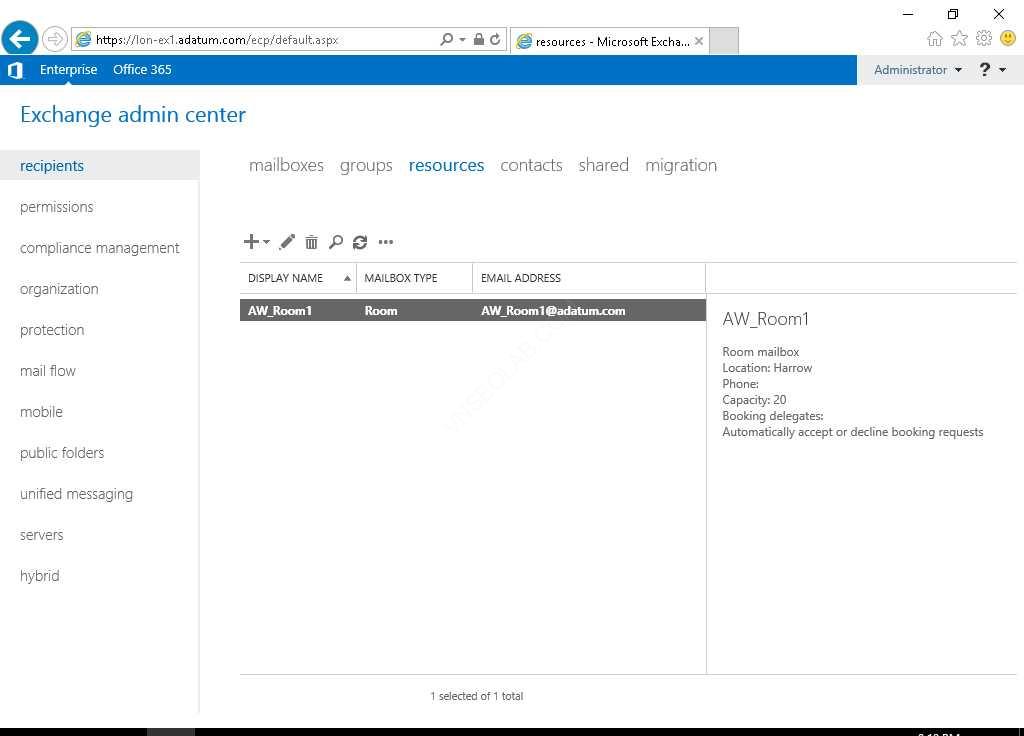
8. Tại tab resources, chọn New, và chọn Room mailbox.

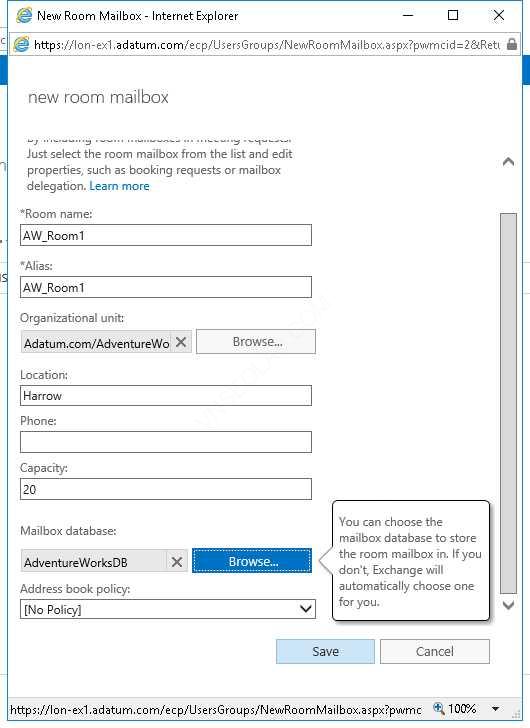
9. Nhập vào các thông tin sau:
- Room name: AW_Room1,
- Alias: AW_Room1,
- Organizational unit: ấn browse,
- chọn AdventureWorks, và ấn OK,
- Location: Harrow,
- Capacity: 20
10. Click more options, trong phần Mailbox database, chọn Browse, và chọn AdventureWorksDB, click OK
11. Ấn Save

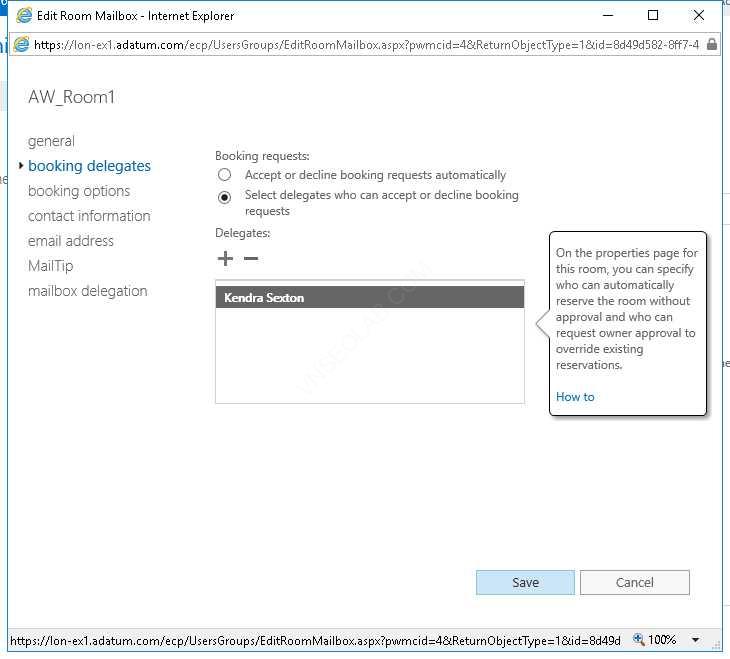
12. Double-click vào AW_Room1 vừa tạo.

13. Chọn tab booking delegates, chọn option Select delegates who can accept or decline booking requests, trong phần Delegates, chọn Add, chọn Kendra Sexton, click add, và ấn OK. ấn Save.

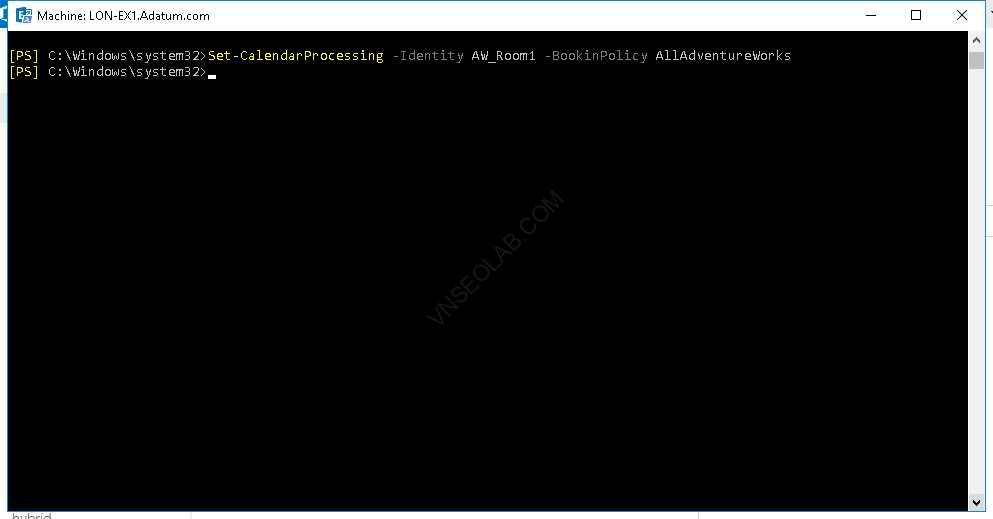
14. Vào Exchange Management Shell, gõ lệnh sau và ấn Enter, để cấu hình resource booking policy:
Set-CalendarProcessing –Identity AW_Room1 –BookinPolicy AllAdventureWorks
15. Tại EX1, trong màn hình Exchange Admin Center, chọn recipients.
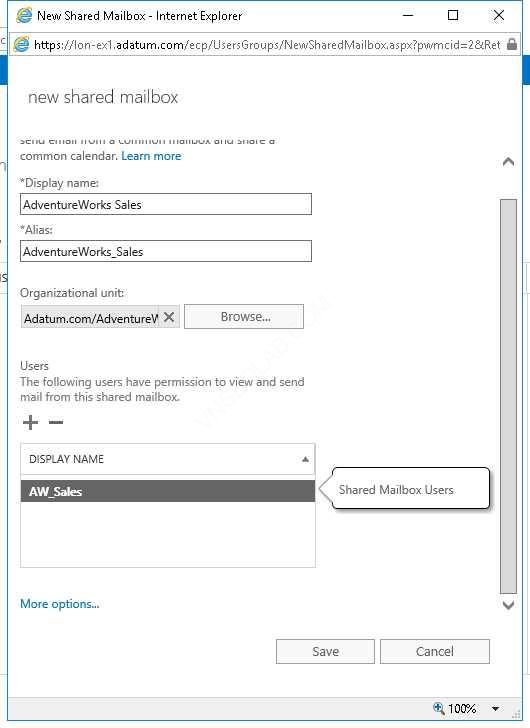
16. Chọn tab shared, click New, và nhập các thông tin sau:
- Display name: AdventureWorks Sales,
- Alias: AdventureWorksSales
- Organizational unit: Adatum.com/AdventureWorks/Sales

17. Trong phần Users, click Add, chọn AW_Sales, click add, và ấn OK
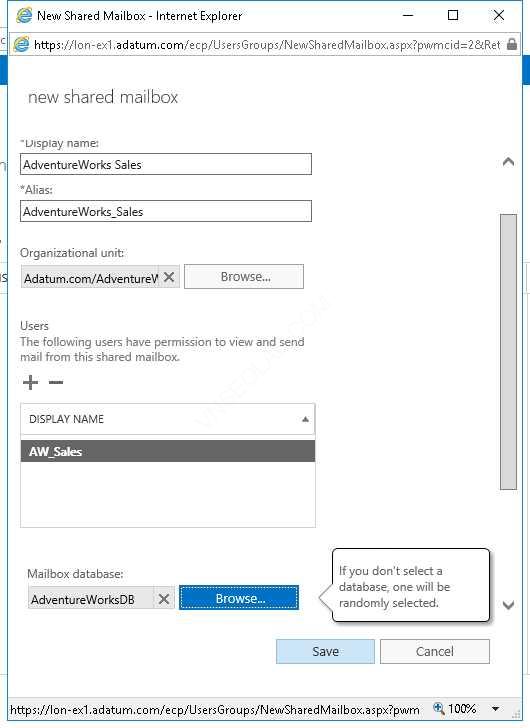
18. Click more option.
19. Trong phần Mailbox database, click browse, chọn AdventureWorksDB, ấn OK. Và Click Save.
Task 3: Tạo Adventure Works Cycles distribution groups
- Tại EX1, Vào Exchange Admin Center, chọn tab groups
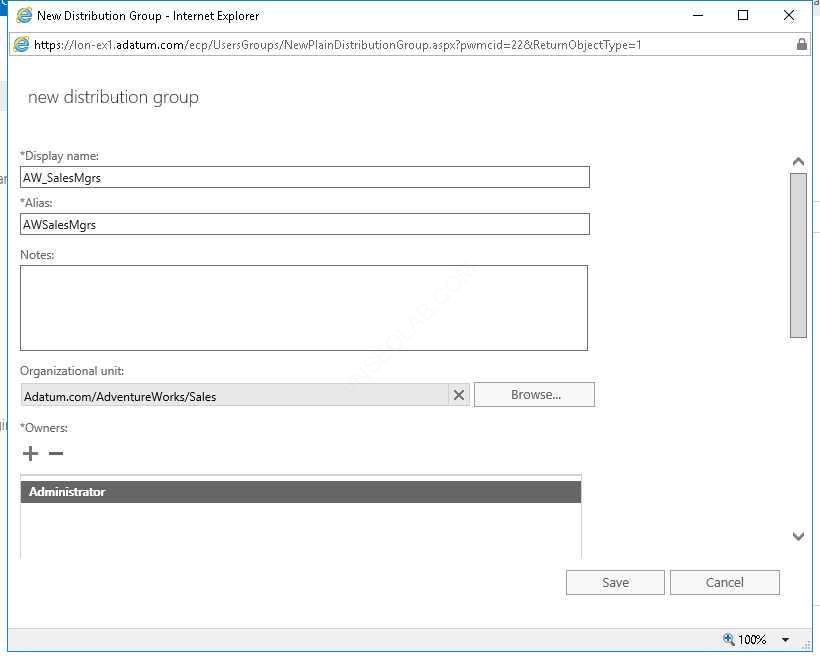
- Chọn New, click Distribution group, và nhập vào các thông tin sau:
- Display name: AW_SalesMgrs
- Alias: AWSalesMgrs
- Organizational unit: Adatum.com/AdventureWorks/Sales

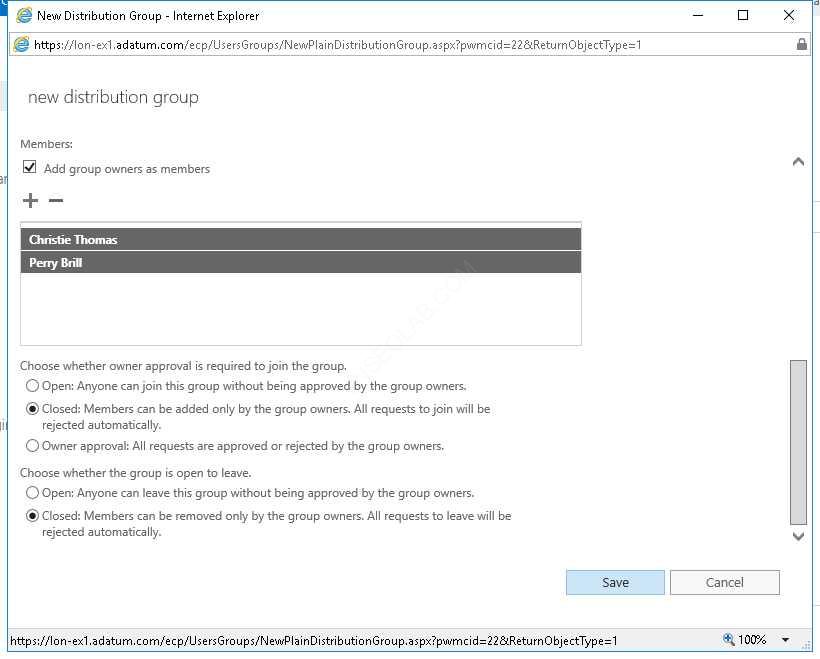
- Members: Christie Thomas, Perry Brill
- Choose Whether owner approval is required: Closed
- Choose whether the group is open to leave: Closed
- ấn save
4. Cũng tại tab groups, click New, chọn Distribution group, và nhập vào các thông tin sau:
- Display name: AdventureWorksNews
- Alias: AdventureWorksNews
- Organizational unit: AdventureWorks
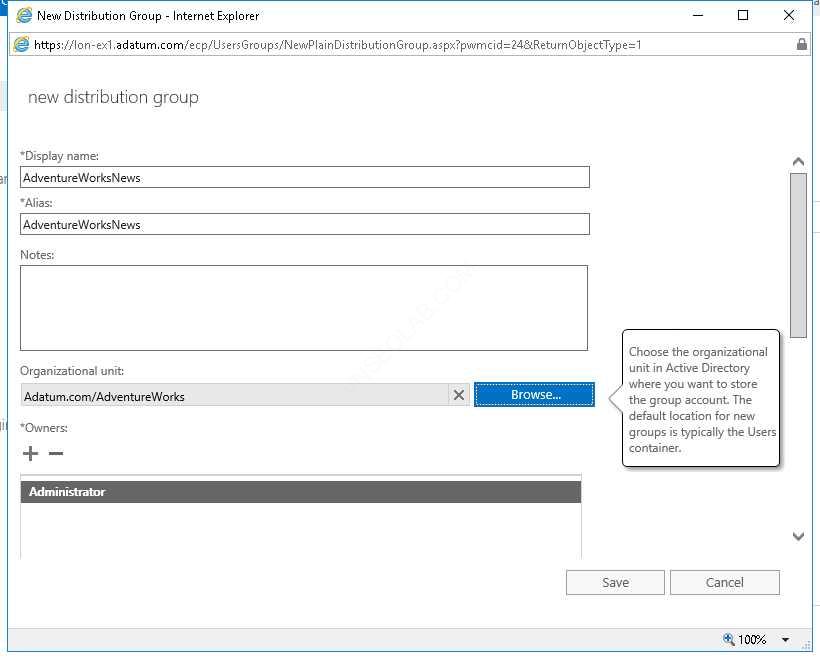
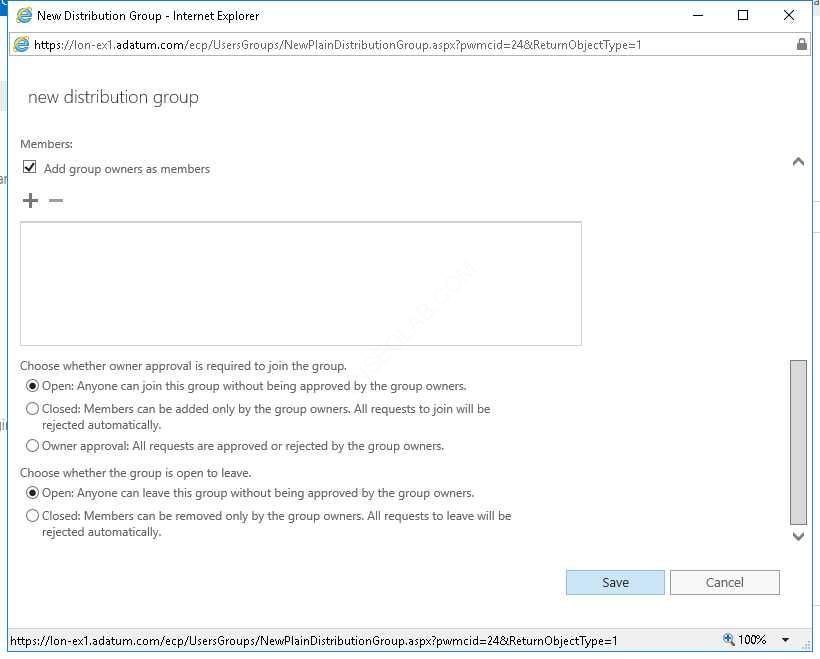
- Members: none
- Owner approval is required: Open
- Choose whether the group is open to leave: Open
- Ấn Save.
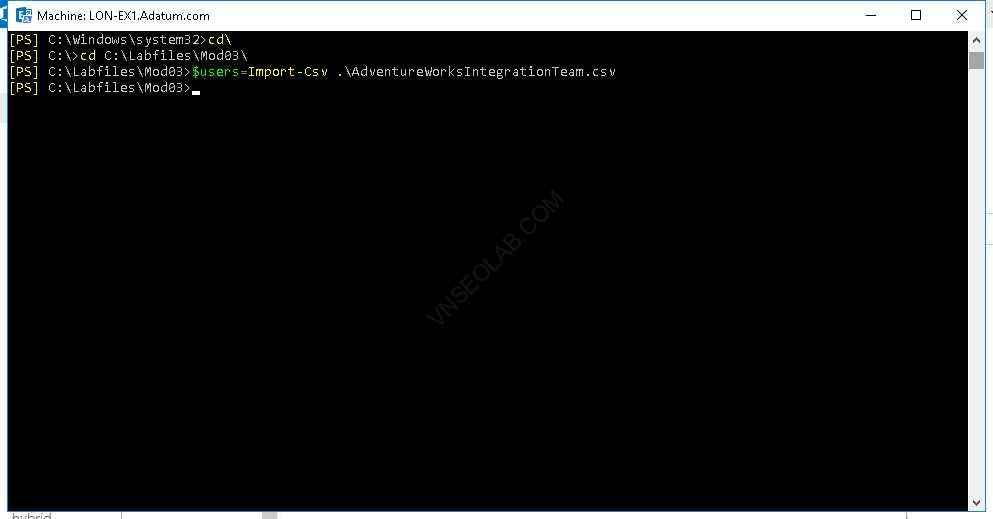
5. Tại EX1, Vào Exchange Management Shell, gõ lệnh sau và ấn enter:
CD C:\Labfiles\Mod03
- Gõ lệnh sau để import user từ danh sách:
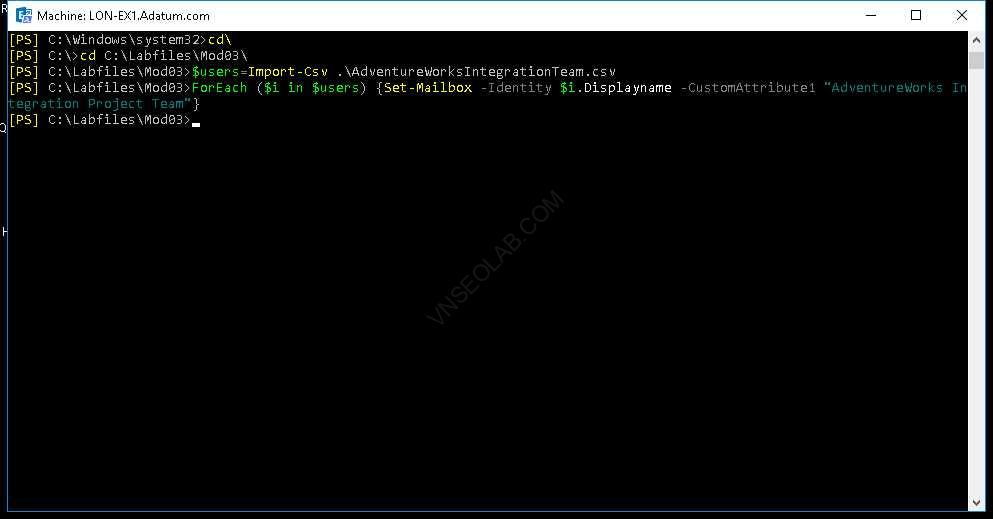
$users=Import-Csv .\AdventureWorksIntegrationTeam.csv
6. Tiếp tục gõ lệnh sau để gán thuộc tính CustomAttribute1 cho các user trong danh sách:
ForEach ($i in $users) {Set-Mailbox –Identity $i.Displayname –CustomAttribute1 “AdventureWorks Integration Project Team”}
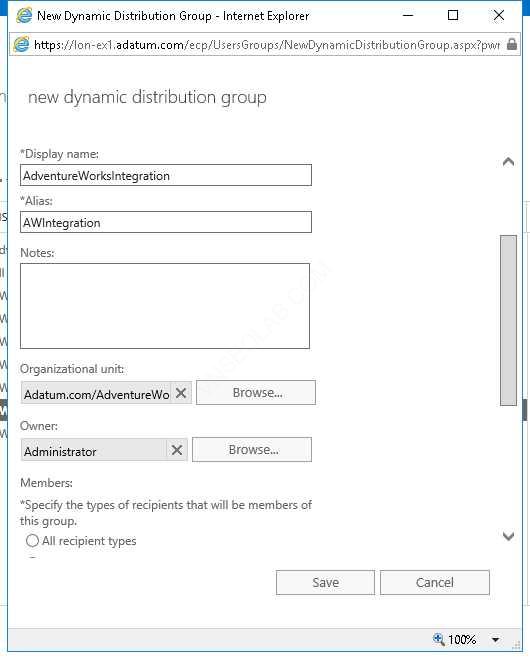
7. Tại EX1, trở lại Exchange Admin Center, tại tab groups, click New, chọn Dynamic distribution group, và nhập các thông tin sau:
- Display name: AdventureWorksIntegration
- Alias: AWIntegration
- Organizational unit: AdventureWorks
- Owner: Administrator

8. Trong phần Members, click Only the following recipient types, và chọn Users with Exchange mailboxes, ấn add a rule
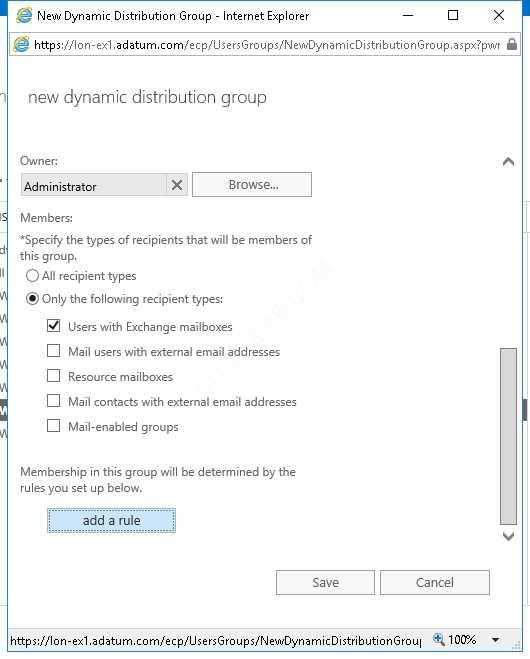
9. Chọn drop-down list, click Recipient container, Click Adatum.com, ấn OK
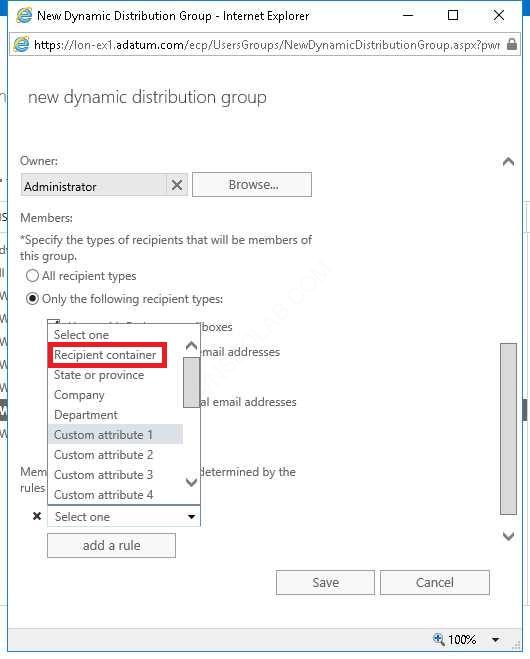
10. Tiếp tục ấn add a rule và chọn Custom attribute 1
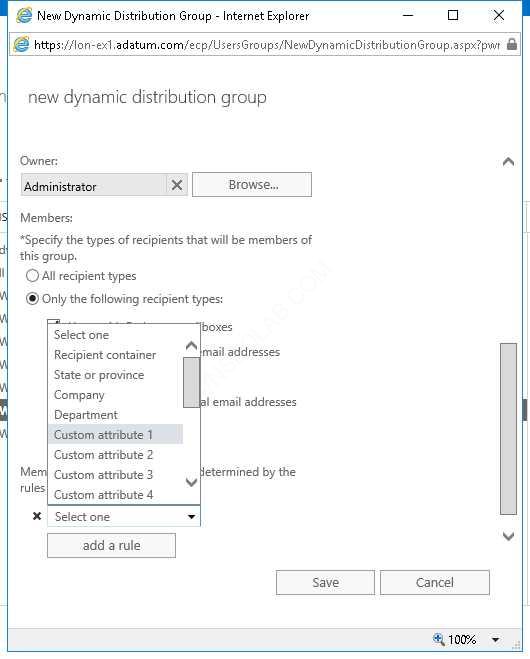
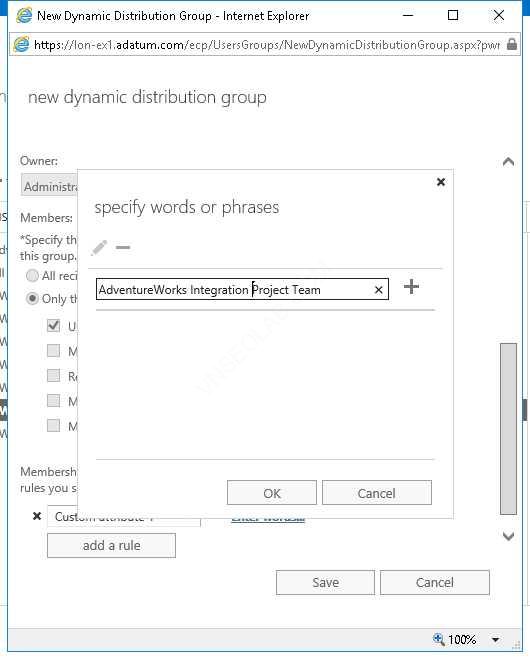
11. Click vào Enter words, trong cửa sổ specify words or phrases, nhập vào AdventureWorks Integration Project Team, click Add(+), ấn OK , Save
Exercise 2: Quản lý public folder mailboxes
Task 1: Tạo public folder mailbox
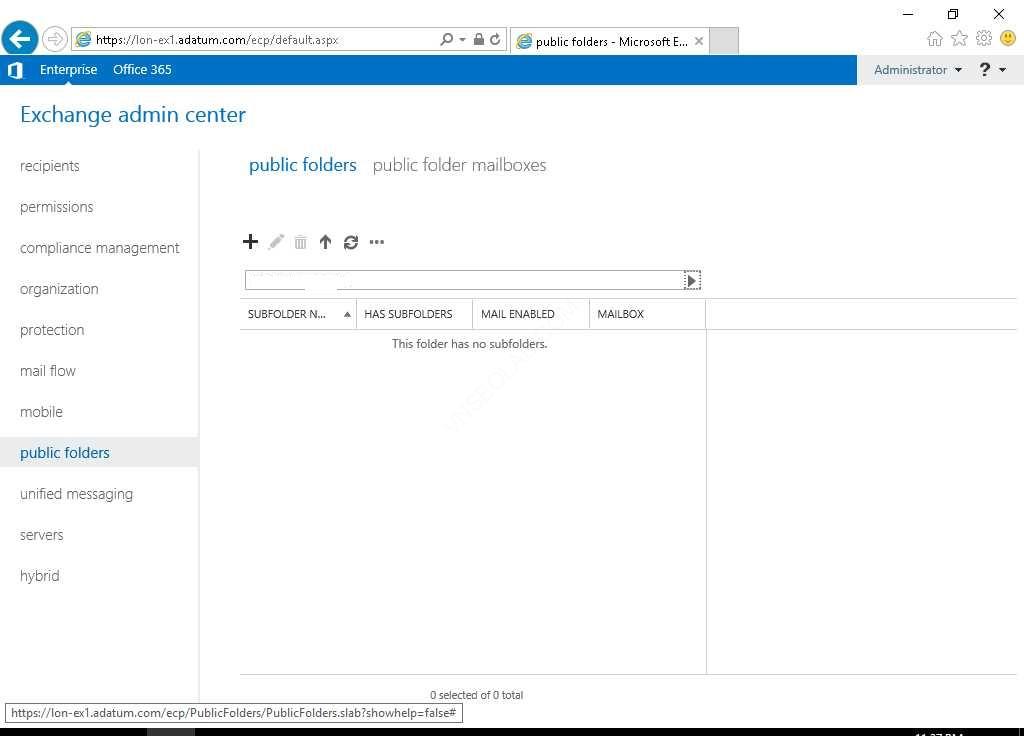
- Cũng Tại EX1, ở cửa sổ Exchange Admin Center
- Bên trái chọn public folders, và chọn tab public folder mailboxes, Chọn new public folder mailbox (+)
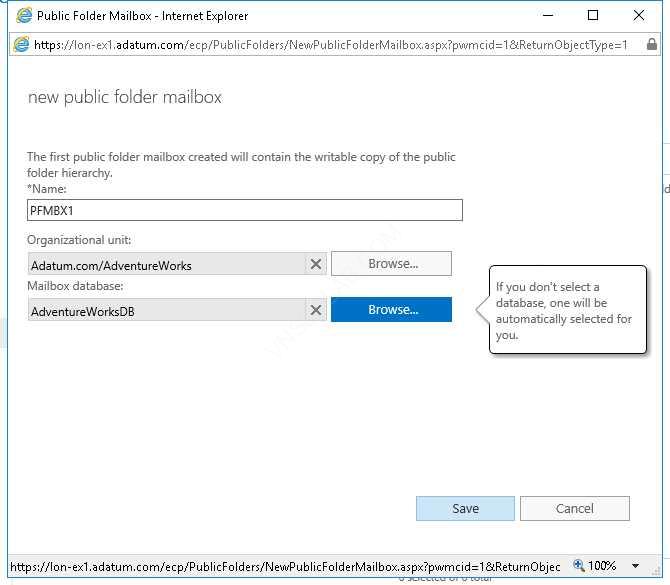
3. Màn hình new public folder mailbox, trong phần Name nhập vào PFMBX1
4. Trong phần Organizational unit, click browse, chọn AdventureWorks, ấn OK
5. Trong phần Mailbox database, click browse, chọn AdventureWorksDB, ấn OK, chọn Save

Task 2: Tạo public folders
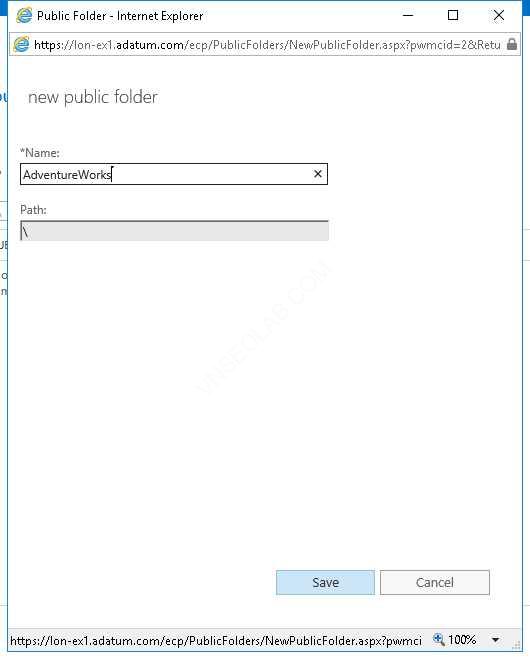
- Tại Exchange Admin Center, chọn public folders, ấn New public folder(+)
2. Tại cửa sổ new Public Folder, trong phần Name nhập AdventureWorks, ấn Save.
3. Click vào AdventureWorks vừa tạo, chọn New public folder (+)
4. Cửa sổ new public folder, trong phần Name nhập Infrastructure, ấn Save.

Task 3: Cấu hình permissions cho public folder.
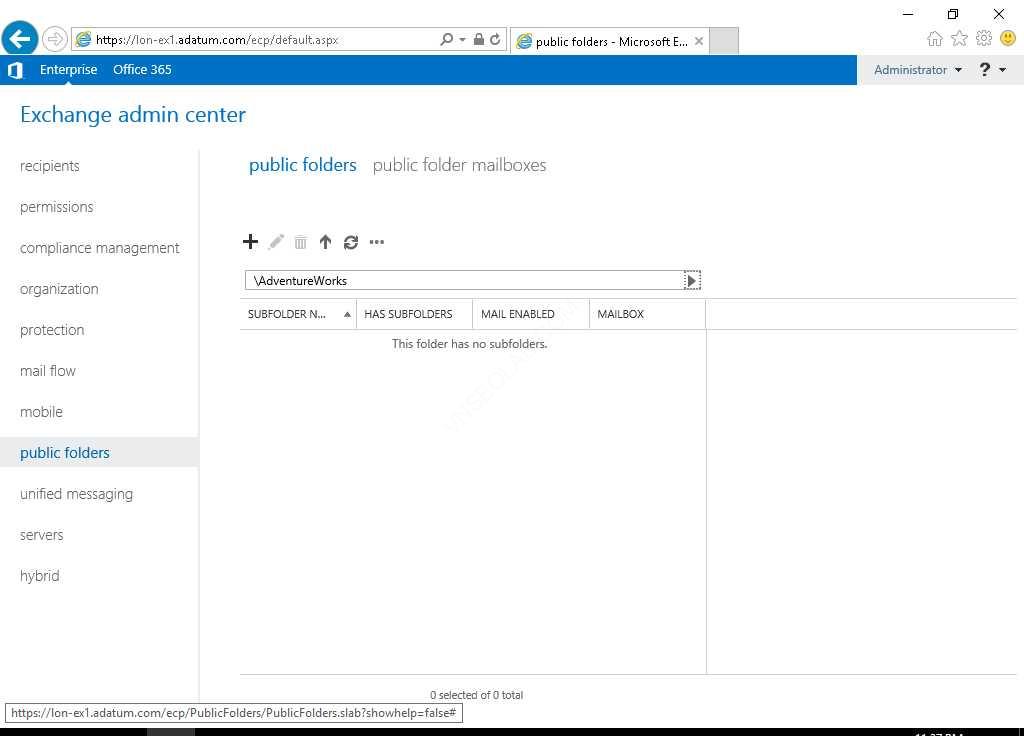
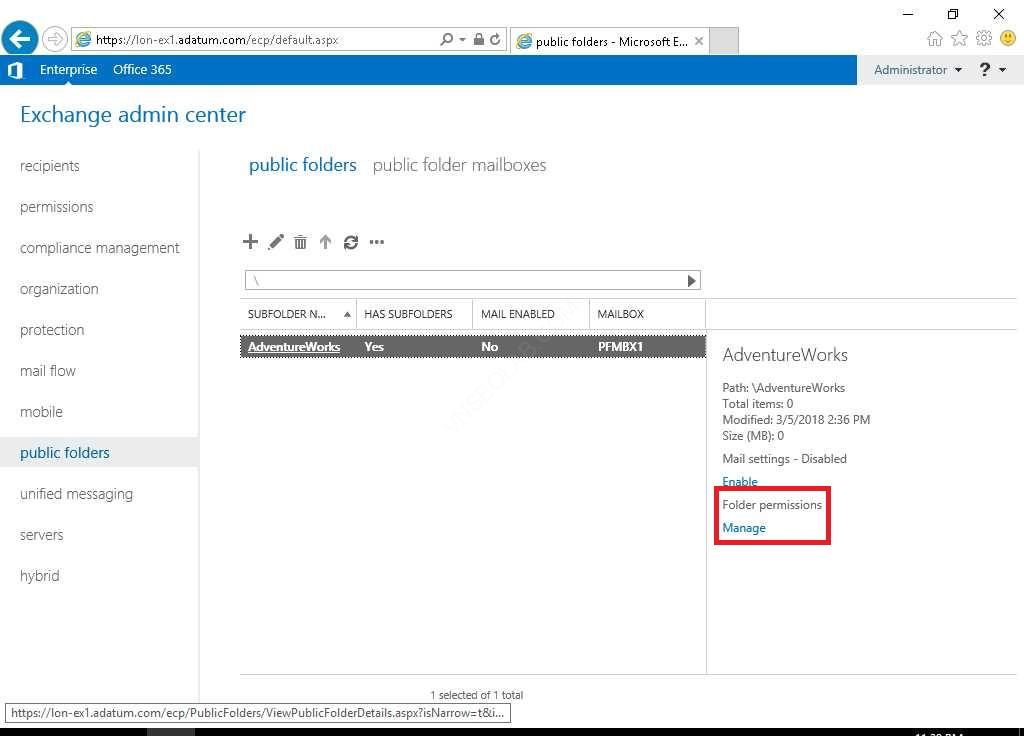
- Cũng tại Exchange Admin Center trên EX1, trở về folder cha
- Kiểm tra có folder AdventureWorks trong danh sách
- Chọn AdventureWorks folder, bên phải trong phần Folder permissions, ấn Manage
4. Cửa sổ AdventureWorks, click Add.
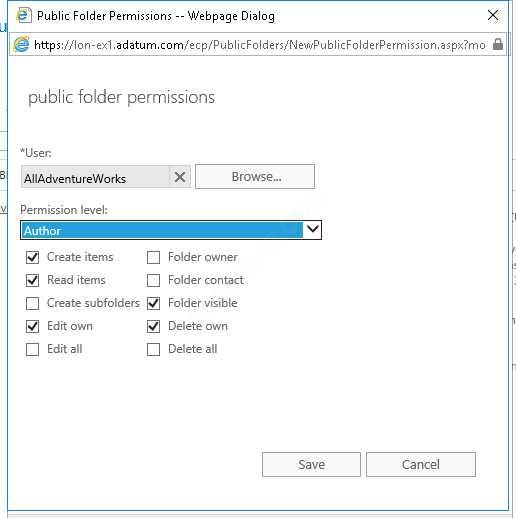
5. Màn hình Public Folder Permissions, trong phần User, click Browse
6. Cửa sổ Select Recipient, chọn AW_IT, ấn OK.
7. Trong phần Permission level, chọn Owner, và ấn Save.
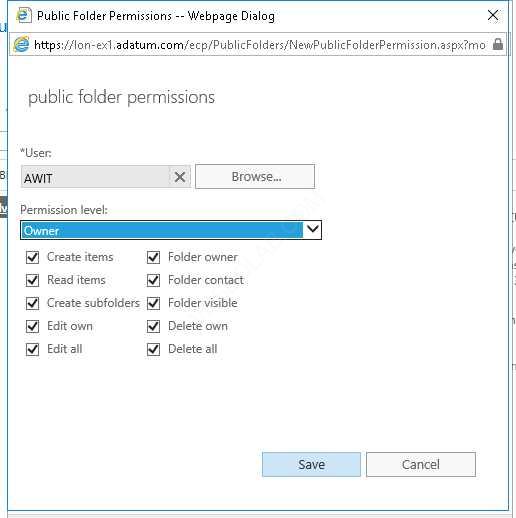

8. Check vào checkbox Apply changes to this public folder and all its subfolders
9. Trong cửa sổ AdventureWorks, tiếp tục click Add (+).
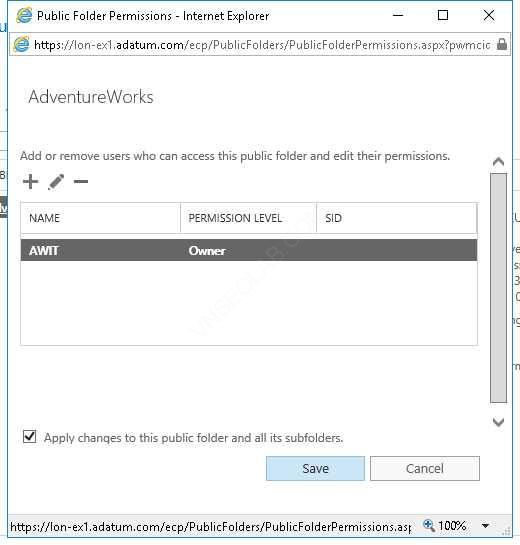

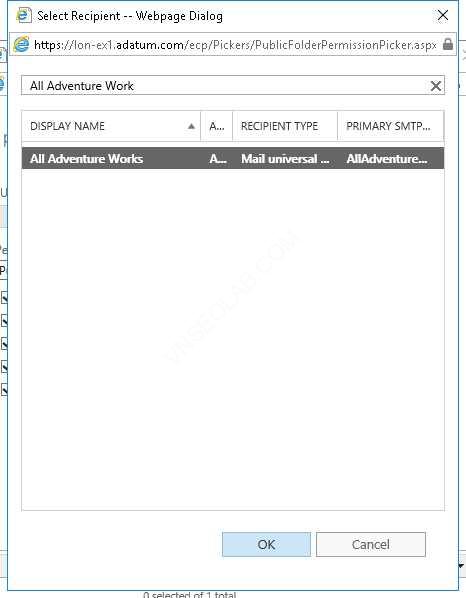
10. Trong cửa sổ Public Folder Permissions, trong phần User, click Browse
11. Trong cửa sổ Select Recipient, chọn All Adventure Works, và click OK

12. Trong phần Permission level, click Author, chọn Save.
13. Tiếp tục ấn Save, và Close.
Task 4: Kiểm tra public folder
- Trên CL1, đăng nhập vào Adatum\Sherri
- Vào Outlook.
- Màn hình Welcome to Outlook 2019, ấn Connect
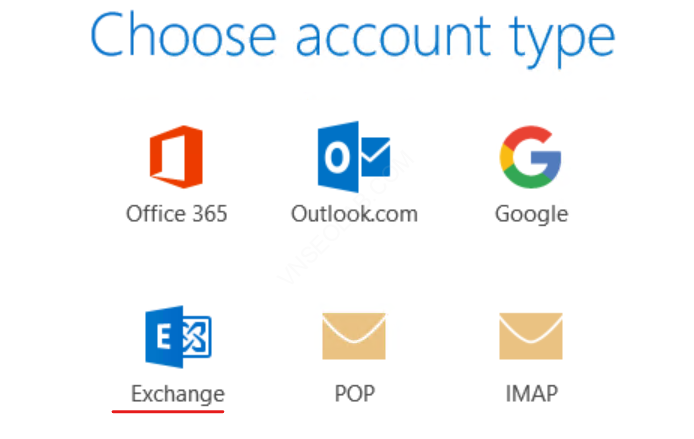
- Màn hình Choose Account Type, chọn Exchange.


5. Màn hình Account Setup Is Complete, ấn Ok
6. Chờ Outlook mở ra.
7. Màn hình Outlook, ở góc dưới bên trái chọn Folders

8. Kiểm tra có Public Folders bên trái.
9. Click Public Folders, kiểm xem có AdventureWorks và Infrastructure public folders hay không?
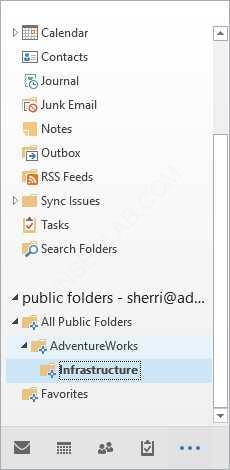

Chú ý: Có thể phải chờ vài phút public folder mới hiện ra. Nếu public folder không xuất hiện đóng và mở lại Outlook 2019 . Nếu vẫn không xuất hiện, logout CL1, và đăng nhập vào Adatum\Sherri, kiểm tra lại public folders.
Lab B: Quản lý Exchange Server email address lists và policies
Exercise 1: Quản lý email-address policies
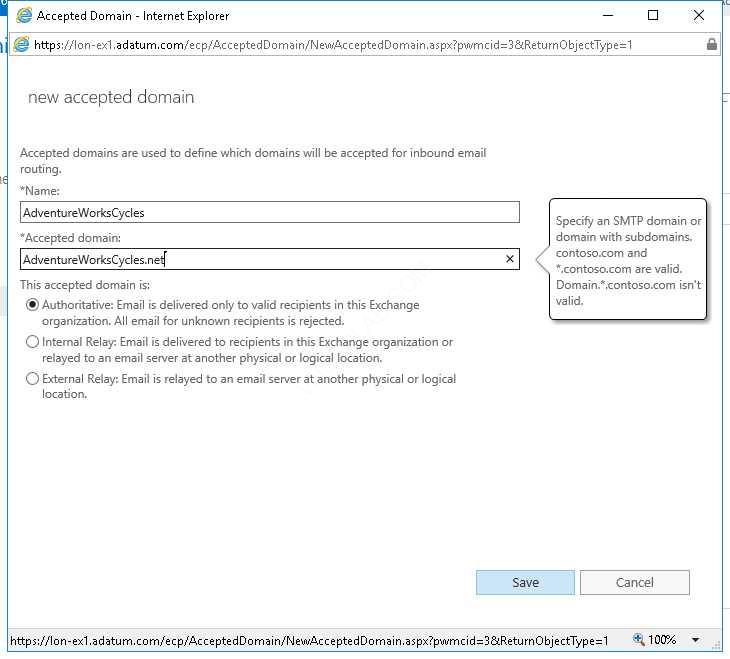
Task 1: Tạo accepted domain mới AdventureWorksCycles.net
- Trên EX1, vào Exchange Admin Center, bên trái chọn mail flow, và chọn tab Accepted domains, click New (+)
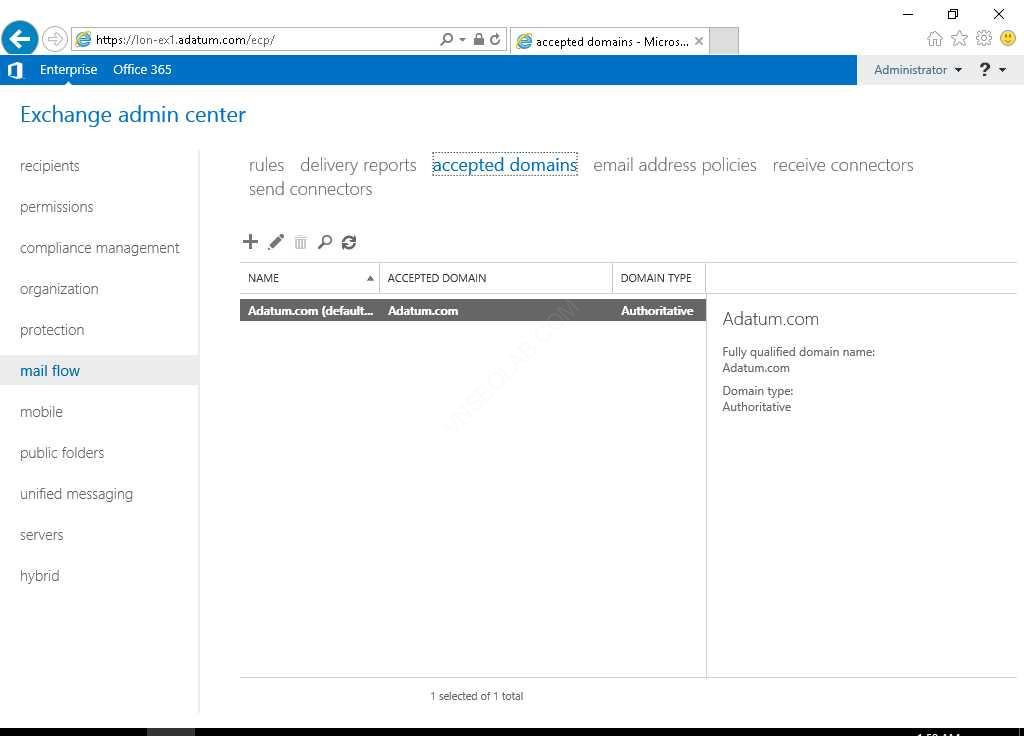
2. Màn hình new accepted domain, trong phần Name gõ vào AdventureWorks Cycles, trong phần Accepted domain nhập vào AdventureWorksCycles.net.
3. Ấn Save.
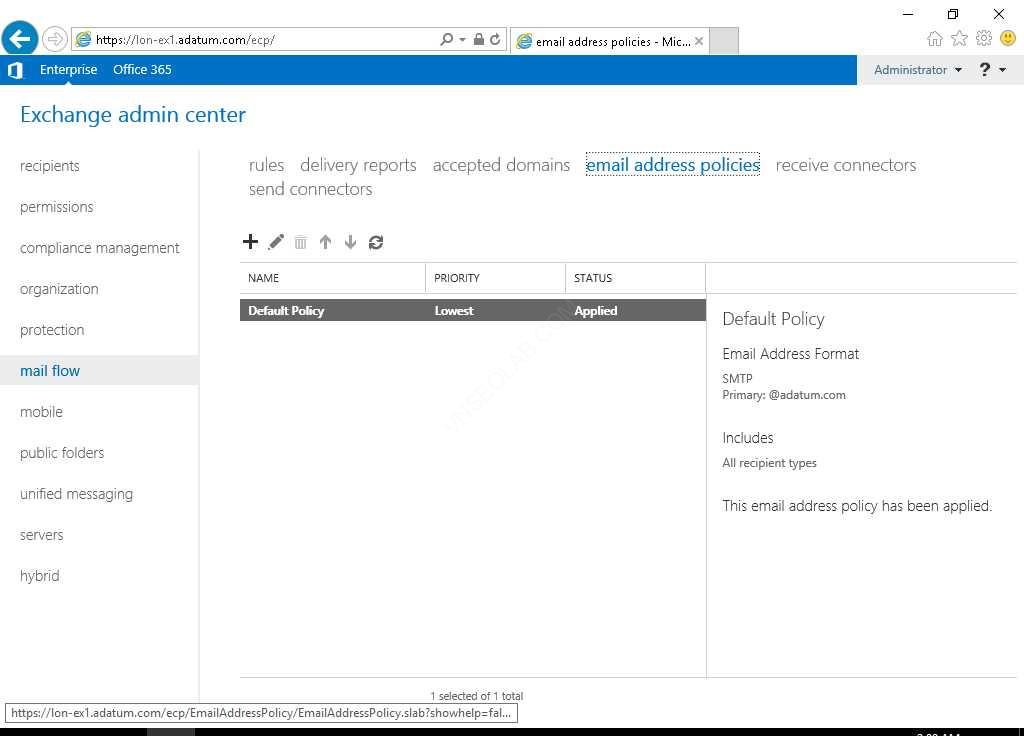
Task 2: Cấu hình email address policy cho Adventure Works Cycles users.
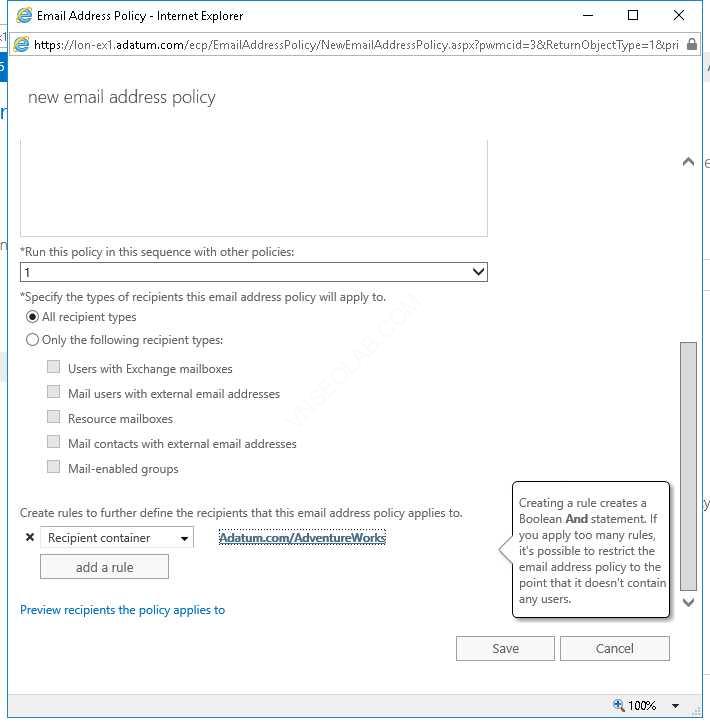
- Tại EX1, vào Exchange Admin Center, chọn tab email address policies, và click New (+).
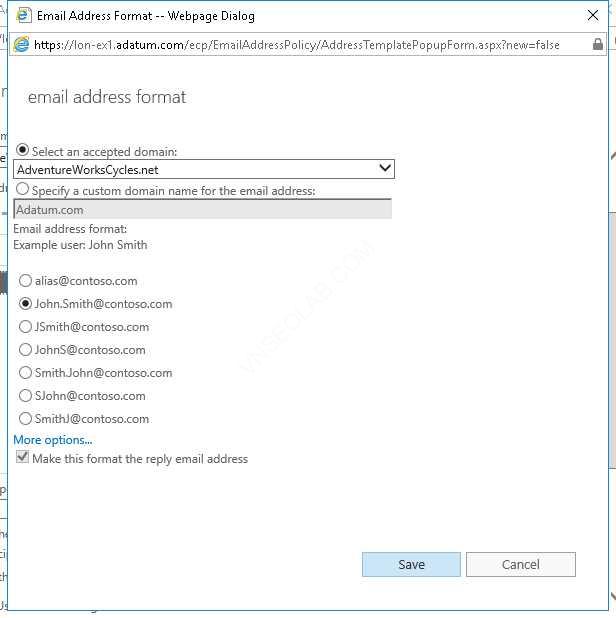
2. Cửa sổ new email address policy, trong phần Policy name nhập vào AdventureWorksCycles Email.
3. Under Email address format, click Add (+)
4. Select an accepted domain chọn AdventureWorksCycles.net
5. Chọn option John.Smith@contoso.com, và click Save

6. Trở lại cửa sổ new email address policy, click add a rule
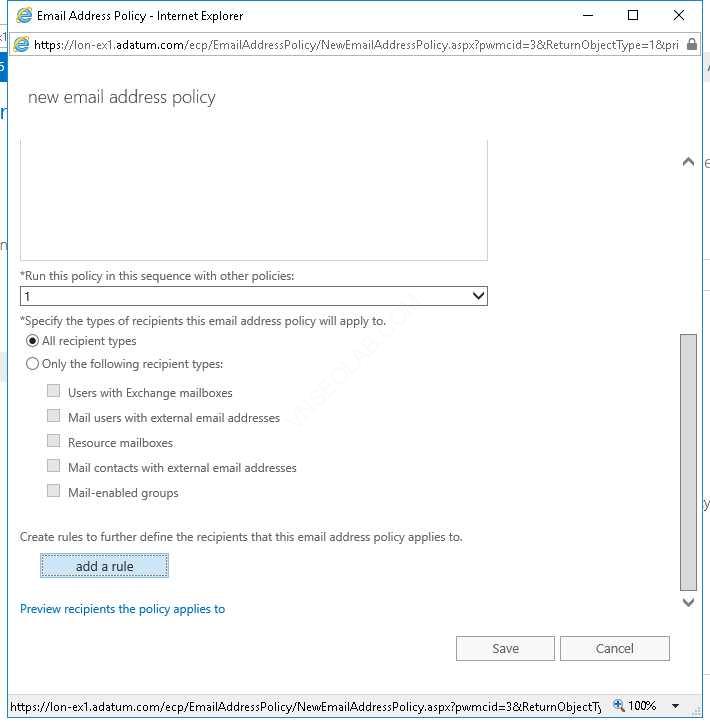

7. Chọn Select one, và chọn Recipient container
8. Trong phần select an organizational unit chọn OU AdventureWorks, ấn OK
9. Click Save, và ấn OK
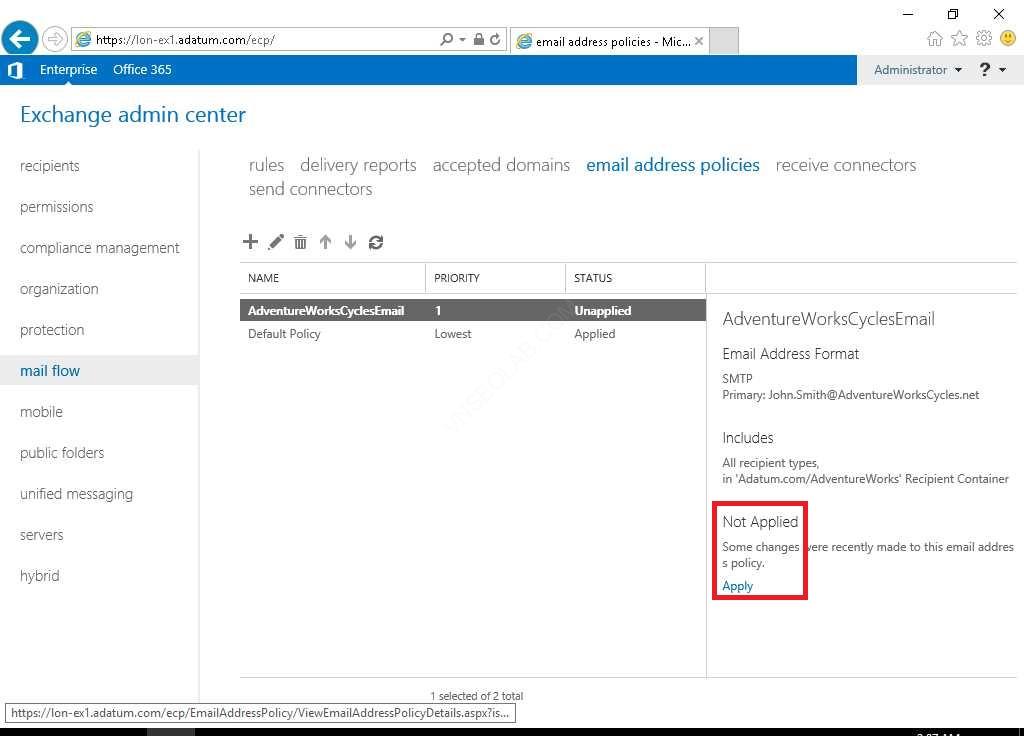
10. Chọn AdventureWorksCycles Email address policy
11. Trong phần Details pane, click Refresh, ấn Apply, click Yes, Close
Task 3: Kiểm tra email addresses đã apply chưa?
- Cũng tại EX1, vào Exchange Admin Center, chọn recipients.
- Chọn tab mailboxes, double-click vào Misty Phillips,
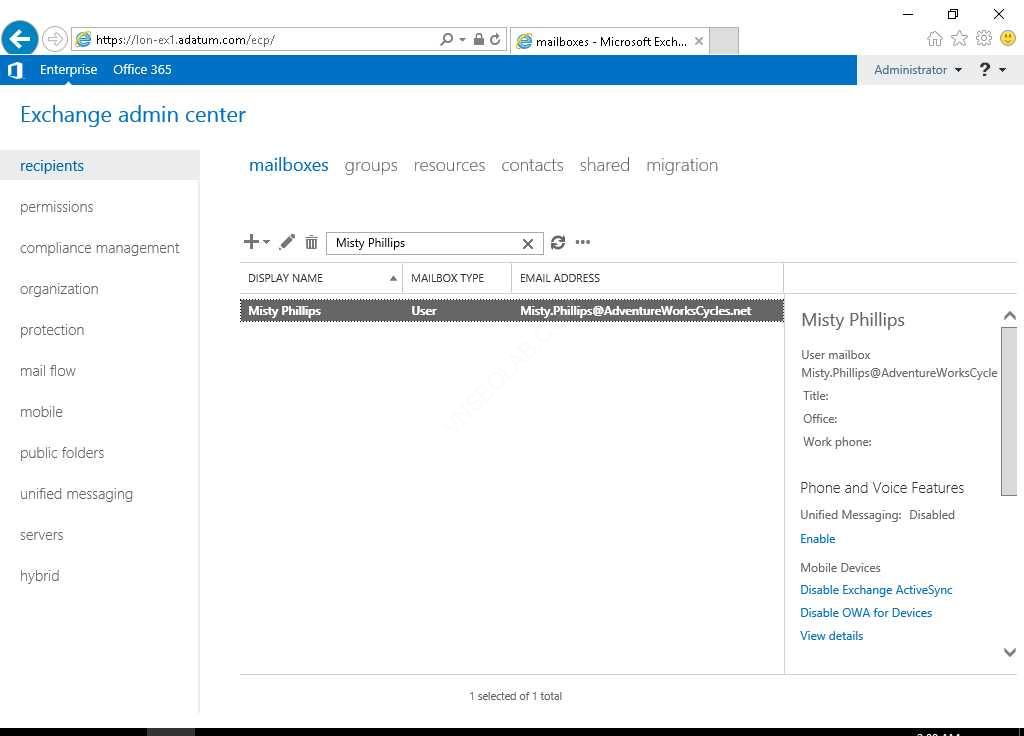
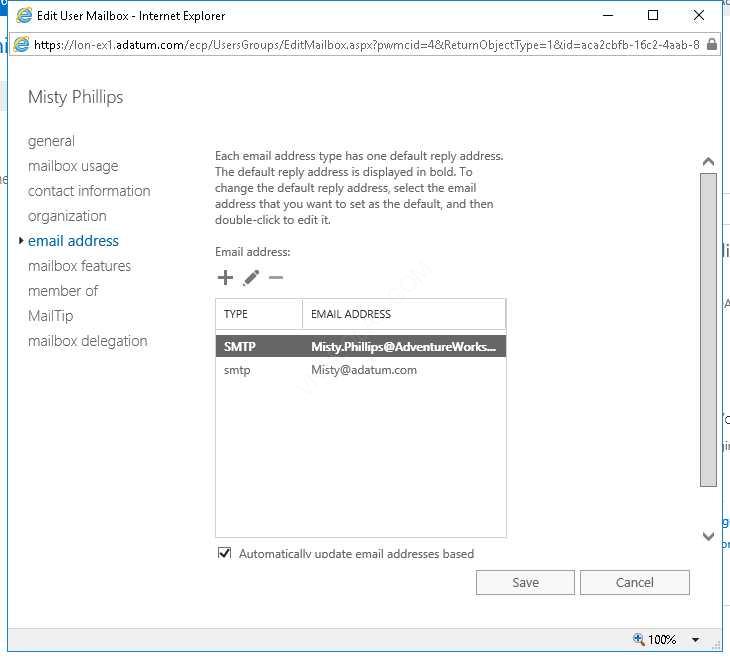
3. và chọn tab email address.
4. Kiểm tra email address của Misty là AdventureWorksCycles.net
5. Click Cancel
6. Tại Exchange Admin Center, click Administrator ở góc trên bên phải, chọn Sign out.
7. Tại Internet Explorer, nhập vào https://ex1.adatum.com/owa.
8. Đăng nhập bằng user Adatum\Misty
9. Chọn time zone, ấn save
10. Ấn New, dòng To, nhập vào Abby (gửi mail cho Abby)
11. Subject nhập vào test mail, nhập vào nội dung email,click Send.
12. Chờ gửi mail xong, Sign out Misty.
13. Tại Internet Explorer https://ex1.adatum.com/owa đăng nhập vào Adatum\Abby
14. Kiểm tra xem có nhận mail của Misty?.
15. Kiểm tra mail của Misty trong phần email address from có phải là FirstName.LastName@adventureworkscycles.net?
16. Sign out Abby
17. Đóng Internet Explorer.
Exercise 2: Quản lý Address lists và Address-book policies
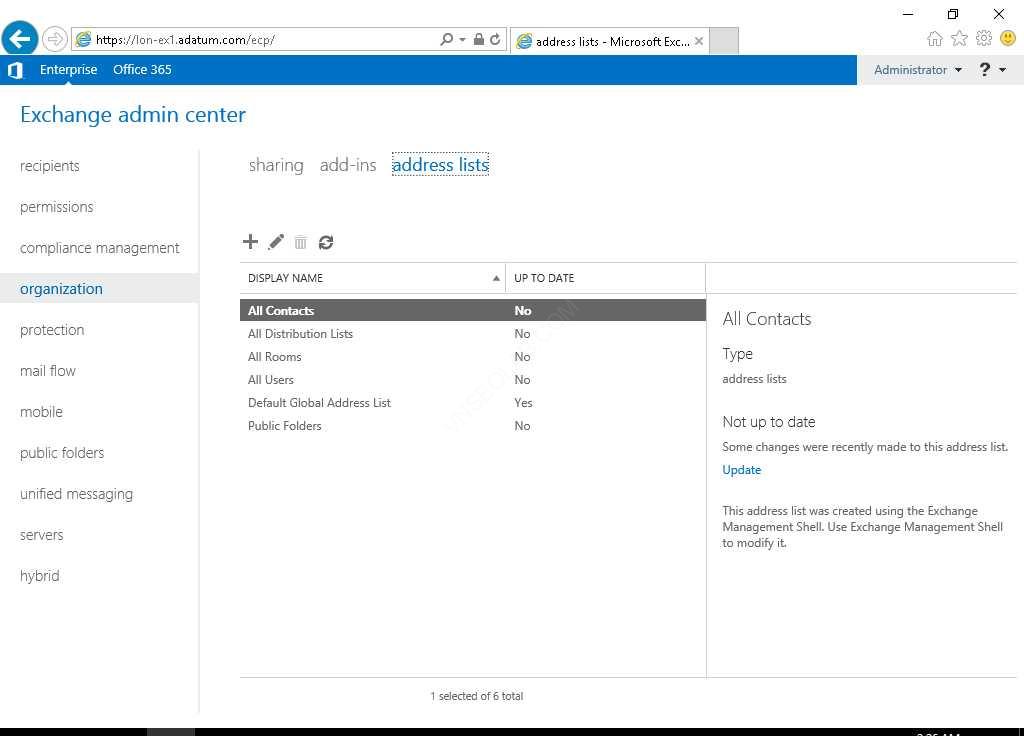
Task 1: Cấu hình address list cho Adventure Works Cycles users
- Tại EX1, vào Internet Explorer gõ https://EX1.adatum.com/ecp
- Đăng nhập vào user Adatum\Administrator
- Tại Exchange Admin Center, chọn organization, và chọn address lists
- Tại tab address lists, ấn New (+).
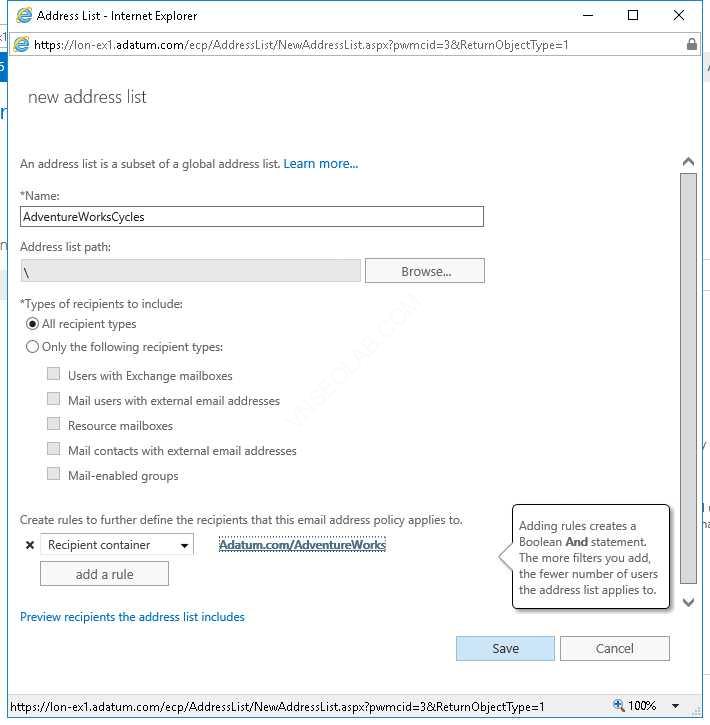
5. Tại cửa sổ new address list, trong phần name nhập AdventureWorksCycles.
6. Click add a rule
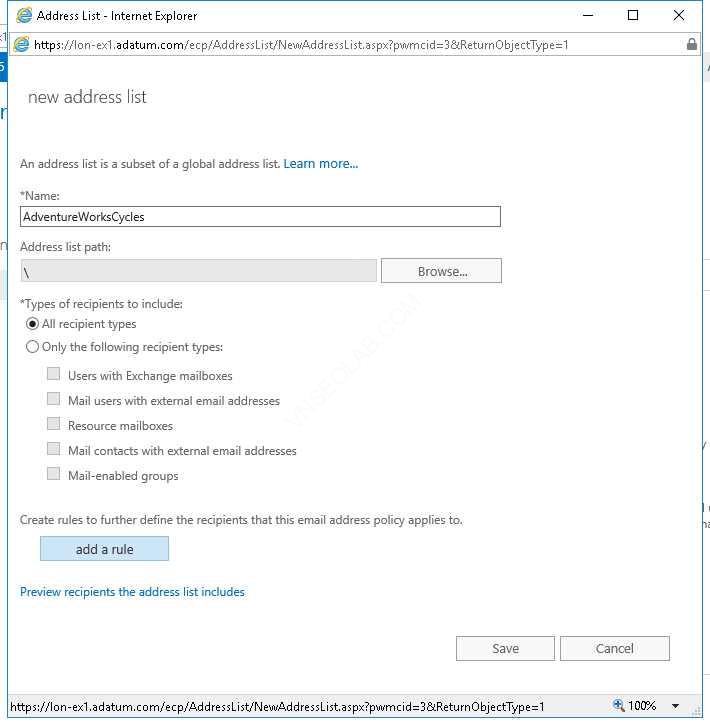
7. Trong phần select one chọn Recipient container
8. Trong phần select an organizational unit, chọn AdventureWorks organizational unit, click OK.
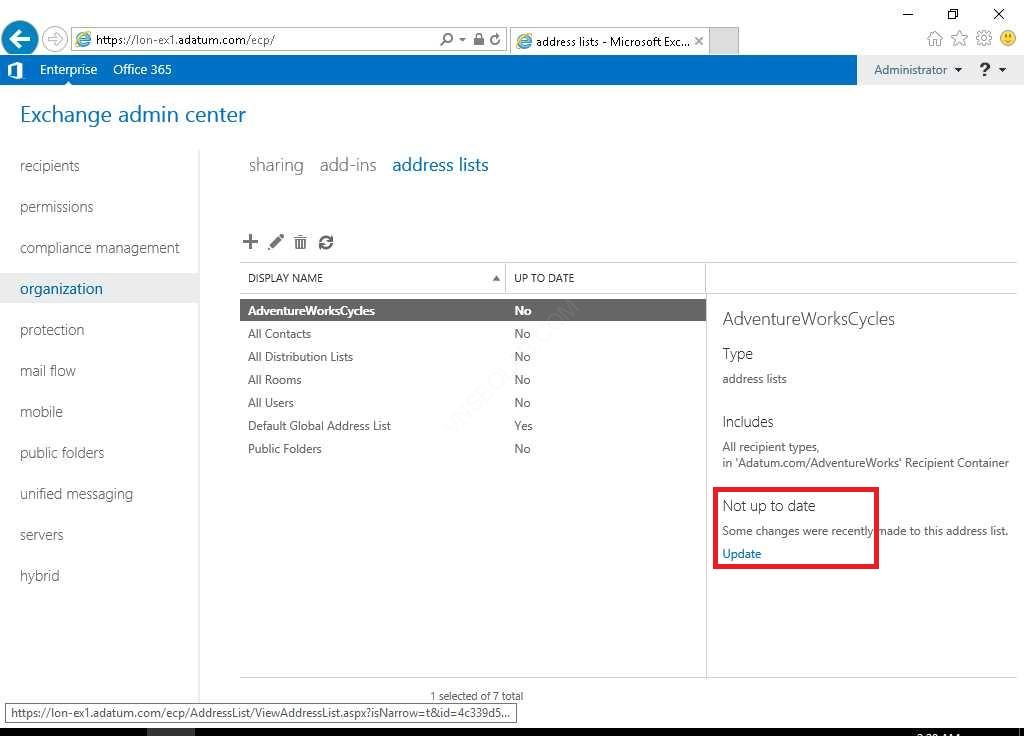
9. Click Save, ấn OK
10. Chọn vào AdventureWorksCycles address list vừa tạo
11. Bên của sổ Details, chọn Update, click Yes, click Close
Task 3: Kiểm tra:
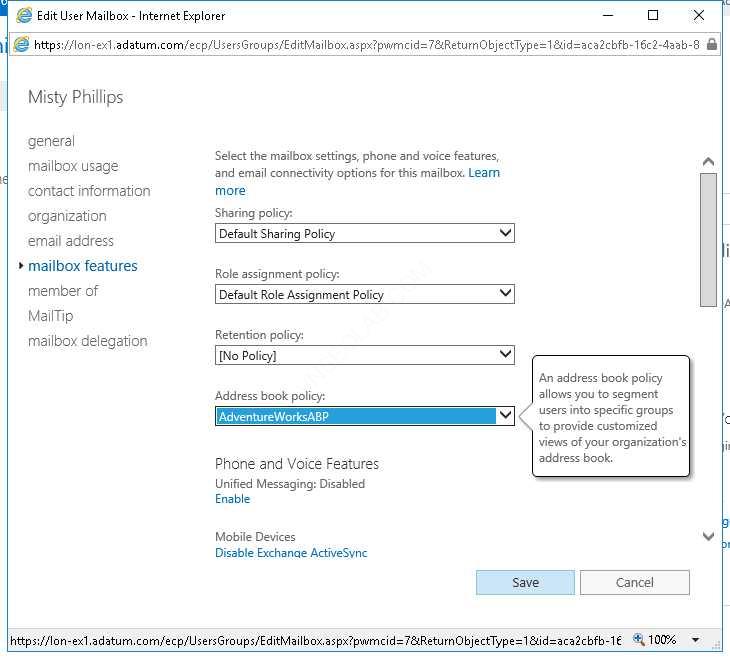
- Tại EX1, vào Exchange Admin Center, chọn recipients, chọn tabs mailboxs.
- double-click Misty Phillips

3. Chọn tab mailbox features, và kiểm tra AdventureWorksABP đã gán cho mailbox Misty, Click Cancel
4. Trên máy CL1, logon bằng user Adatum\Misty
5. Mở Outlook, Màn hình Welcome to Outlook ấn Connect


6. Màn hình Choose Account Type, chọn Exchange.
7. Màn hình Account Setup Is Complete, ấn Ok
8. Và chờ Outlook mở ra
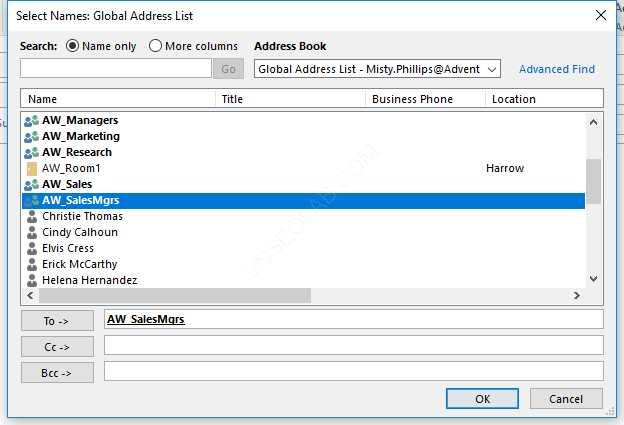
9. Click New Email , ấn to
10. Kiểm tra xem Misty chỉ có thể thấy các users và groups trong AdventureWorks OU.
11. Chọn AW_SalesMgrs, click To, và ấn OK.

12. Trong phần Subject nhập vào test mail, nhập nội dung mail, ấn Send.
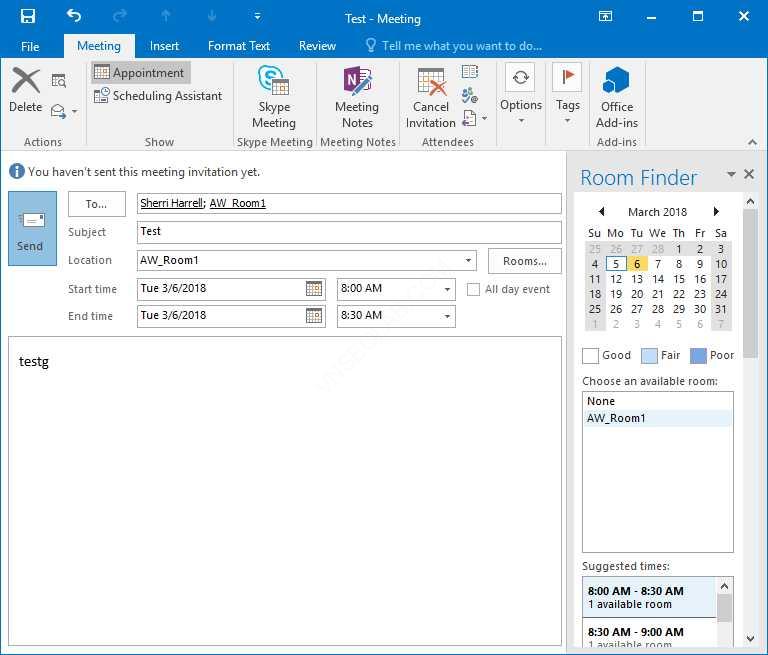
13. Chọn Calendar icon và click New Meeting
14. Màn hình Untitled – Meeting, click To.
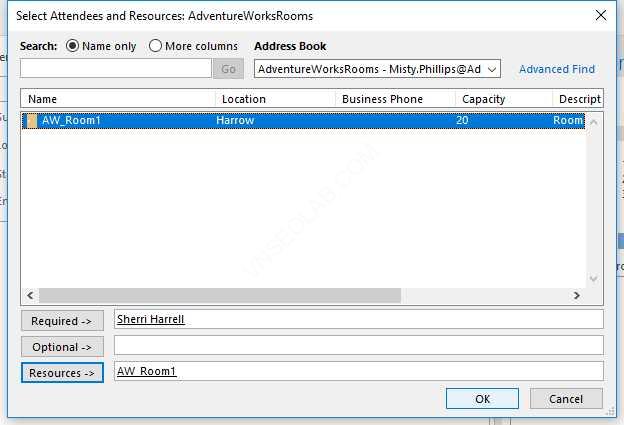
15. Chọn Sherri Harrell, ấn Required và chọn AW_Room1, click Resources, OK
16. Trở về màn hình Untitled – Meeting chọn thời gian cho Start time và end time
17. Nhập nội dung cho dòng Subject, và nội dung cuộc hợp, click Send

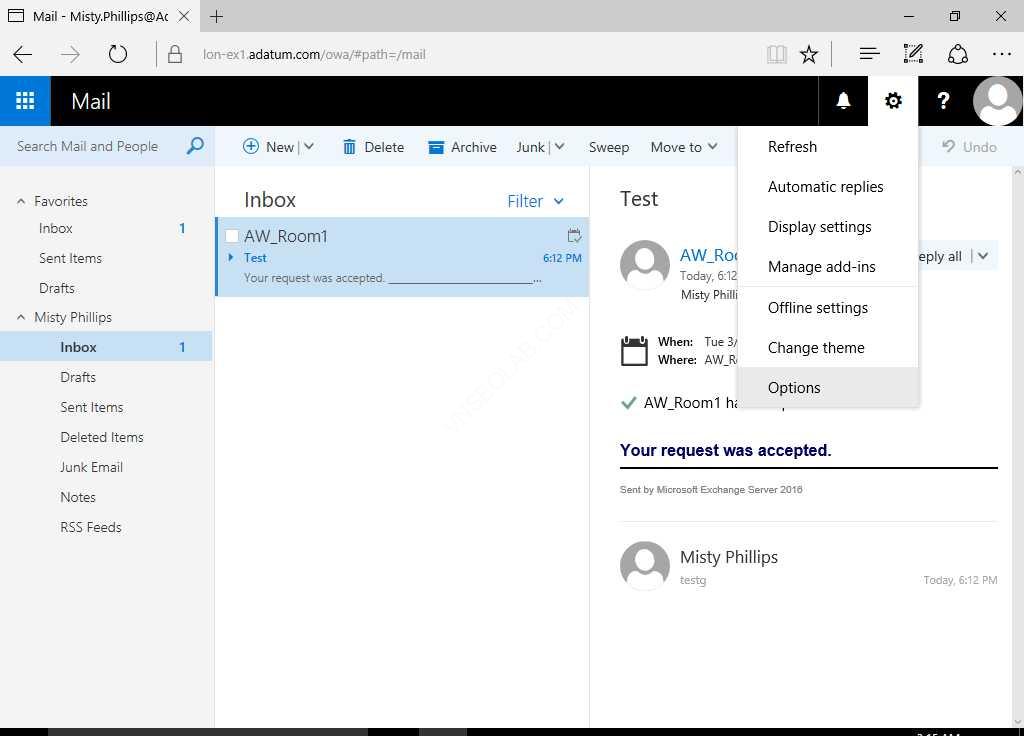
18. Chờ chút sẽ nhận được mail của AW_room1, đóng outlook
19. Mở Microsoft Edge, vào trang https://ex1.adatum.com/owa
20. Đăng nhập bằng user Adatum\Misty
21. Tại Outlook on the web, click Settings icon ở góc trên bên phải, chọn Options
22. Trong Options, chọn General. Trong General, chọn Distribution groups
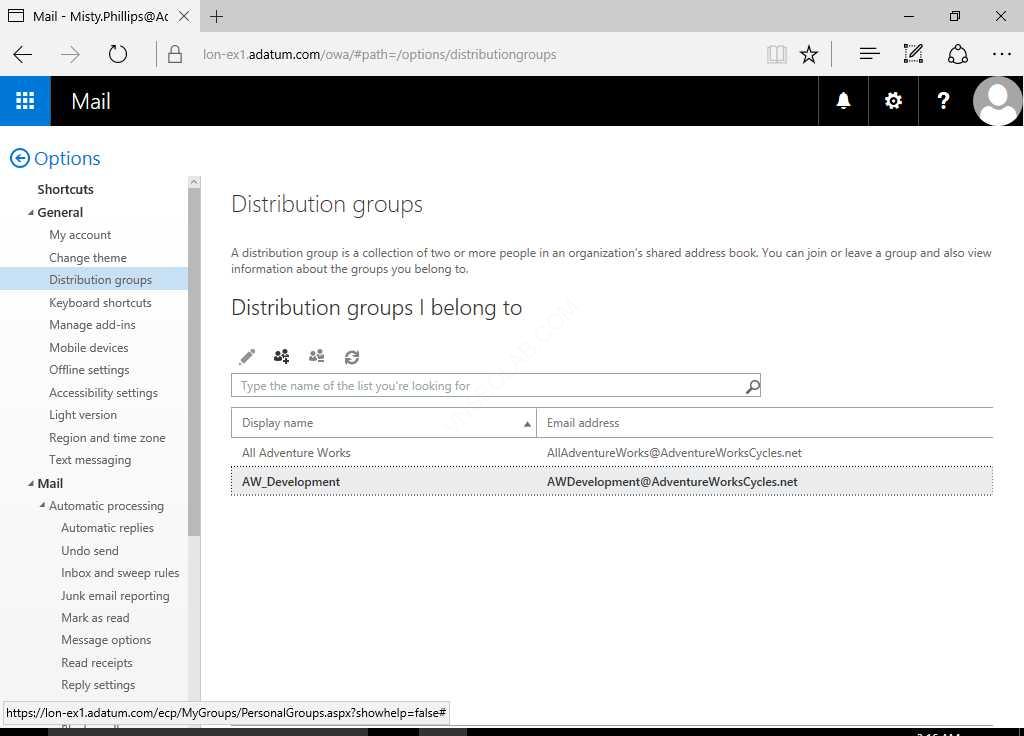
23. Màn hình Distribution groups I belong to, click icon Join
24. Cửa sổ all groups, double-click vào AW_SalesMgrs
25. Cửa sổ AW_SalesMgrs, click Join
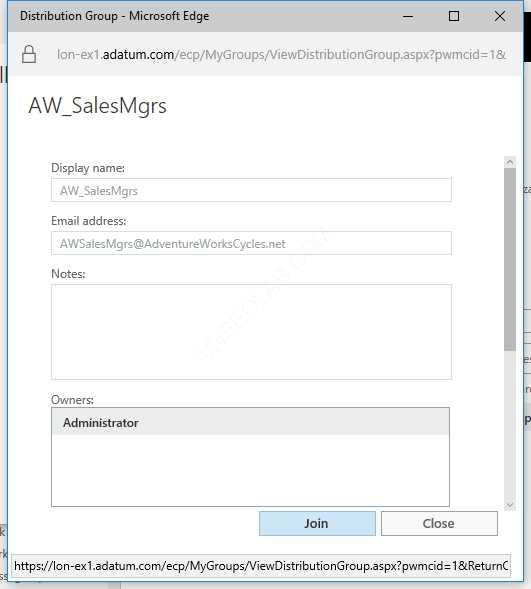

26. Nhận được thông báo lỗi, ấn ok. Click close
27. Trở lại cửa sổ all groups, double-click AdventureWorksNews
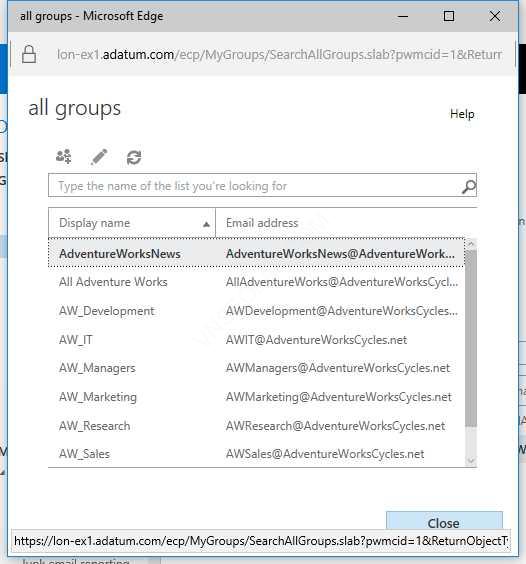

28. Tại cửa sổ AdventureWorksNews, click Join, trở về all group ấn Close
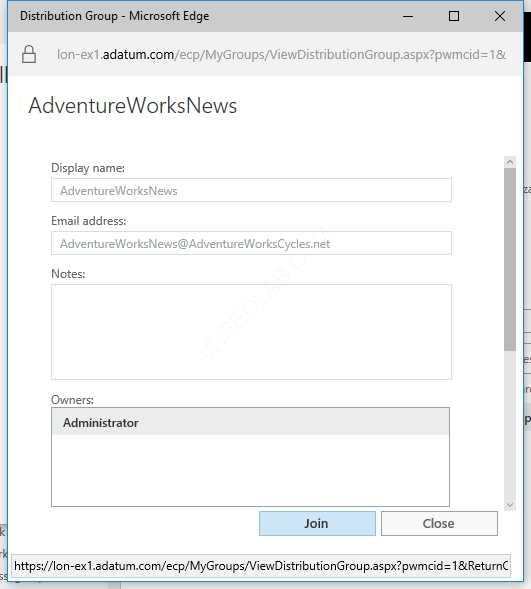
29. Kiểm tra Misty đã là thành viên của AdventureWorksNews distribution group.
30. Đóng Microsoft Edge
31. Vào Outlook 2019, click New Email
32. Dòng To nhập vào awintegration@adatum.com, gõ nội dung cho subject, và nội dung mail, click Send.
33. Vào Microsoft Edge, truy cập vào https://ex1.adatum.com/owa, với user là Adatum\Abby.
34. Kiểm tra xem Abby nhận được email gửi cho adventureworksintegration dynamic distribution group.
Hoàn tất bài lab.